Subject Matter and Depth of Field.
On the first afternoon we took a walk through a lovely garden area connected to the University of Utah. Many of the shots I took were of the flowers that were in bloom in the gardens. There were some challenges in that regard because I did not have my macro lens or a tripod, so obtaining extreme close-ups was pretty much out of the question. At one point we passed some crimson-leafed plants back-lit by the sun that caught my attention. I tried a shot at a high f-stop (small aperture) of f/22 in an effort to maximize depth of field to put in focus as large a portion as possible of the leaves. However, there was a breeze that kept the leaves in motion, blurring the shot which had to be at a very slow shutter speed (1/4 second) to maintain an adequate exposure. Moreover, that put the background in at least partial focus, taking attention away from the crimson leaves, which were the real subject of the shot.
I finally decided that, since the real point of the shot was the back-lit color of the leaves, I would open up the aperture (to f/4.5, as it turns out). This had the effect of blurring most of the red leaves, as well as the background. However, it allowed for a significantly faster shutter speed (1/60 second) so at least some portion of the leaves were in focus, which helped to identify what they were. The background was pretty much fully blurred out, and I felt that its predominantly yellow color actually complemented the crimson of the leaves. So I wound up with a recognizable abstract in red and yellow.

On our hike to Landscape Arch we walked along a variety of beautiful red sandstone walls. Although I took a series of shots of what I felt were interesting textures in the rock, at one point there was a dead sapling along one rock wall that presented an opportunity to capture both the sapling and the wall. Initially, I tried to capture both the texture of the rock and the detail of the sapling by taking a shot at a small aperture of f/20 to create greater depth of field and keep both the wall and sapling in focus. However, in the end I decided to make the sapling the primary subject and the wall secondary by reducing the aperture to f/7 and focusing on the sapling. This softened slightly the focus on the wall but kept all of the sapling in focus, which I felt made it "pop out" better from the background. My only regret was that I wish the sapling had had more complexity.

Sunlight and Texture.
As I stated before, I like to capture textures because they can provide an opportunity to create an image that is both abstract and recognizable. In some cases the texture is dependent on lighting, namely, sunlight and shadows, to make a statement. The following image taken during our visit to Canyonlands NP I think illustrates such a situation:

However, for other situations, the texture of the surface is interesting enough without reliance on the contrast provided by sunlight and shadow and, in fact, sharp shadows would actually detract from the aesthetics of the image. I took the following images, all in Arches NP, during times of overcast because I felt the texture (or simply the color) was strong enough in and of itself. (Sometimes, of course, you don't have a choice of sun or overcast and you have to take what is available.)


Cropping.
One of the benefits of having more megapixels to work with is that you can crop images to eliminate distracting elements or to emphasize those elements to which you want to draw attention.
When we visited the "remote" viewing sites for Delicate Arch, the iconic arch was well positioned for photo opportunities but at a considerable distance. As a result, even with my zoom lens, the arch occupied only a relatively small portion of the overall image. Here is one of the shots as originally taken.

This was actually taken with the lens at 165mm. It shows a substantial foreground expanse of slickrock that I thought simply took attention away from the intended subject. In retrospect, it might have been better to have positioned the arch in the lower portion of the image to eliminate the slickrock and to focus on the sky, which was getting "interesting," including a number of lightning strikes. In any event, I thought the rock formations to the right of the arch actually added some helpful context to the shot. In the end, I chose to create a narrow image that I felt improved the overall effect:

I liked the fact that the land was on a slope.
Here is another shot (taken at 300mm) from a slightly closer viewing area:

At first I thought the rock formation in the foreground would add context and interest; however, I did not like the fact that I had placed the arch in the middle of the image, and the arch still appeared pretty small. As stated, the sky was becoming "interesting," and it was great that the clouds behind the arch were complex and relatively dark and yet the sun was out creating a nice contrast in the texture of the rock. I finally decided to focus on the sky as a strong secondary subject for the image and cropped the shot fairly tightly around the arch. I placed the arch in the lower right-hand corner of the cropped image to allow for more attention on the clouds. Here is the shot as cropped:
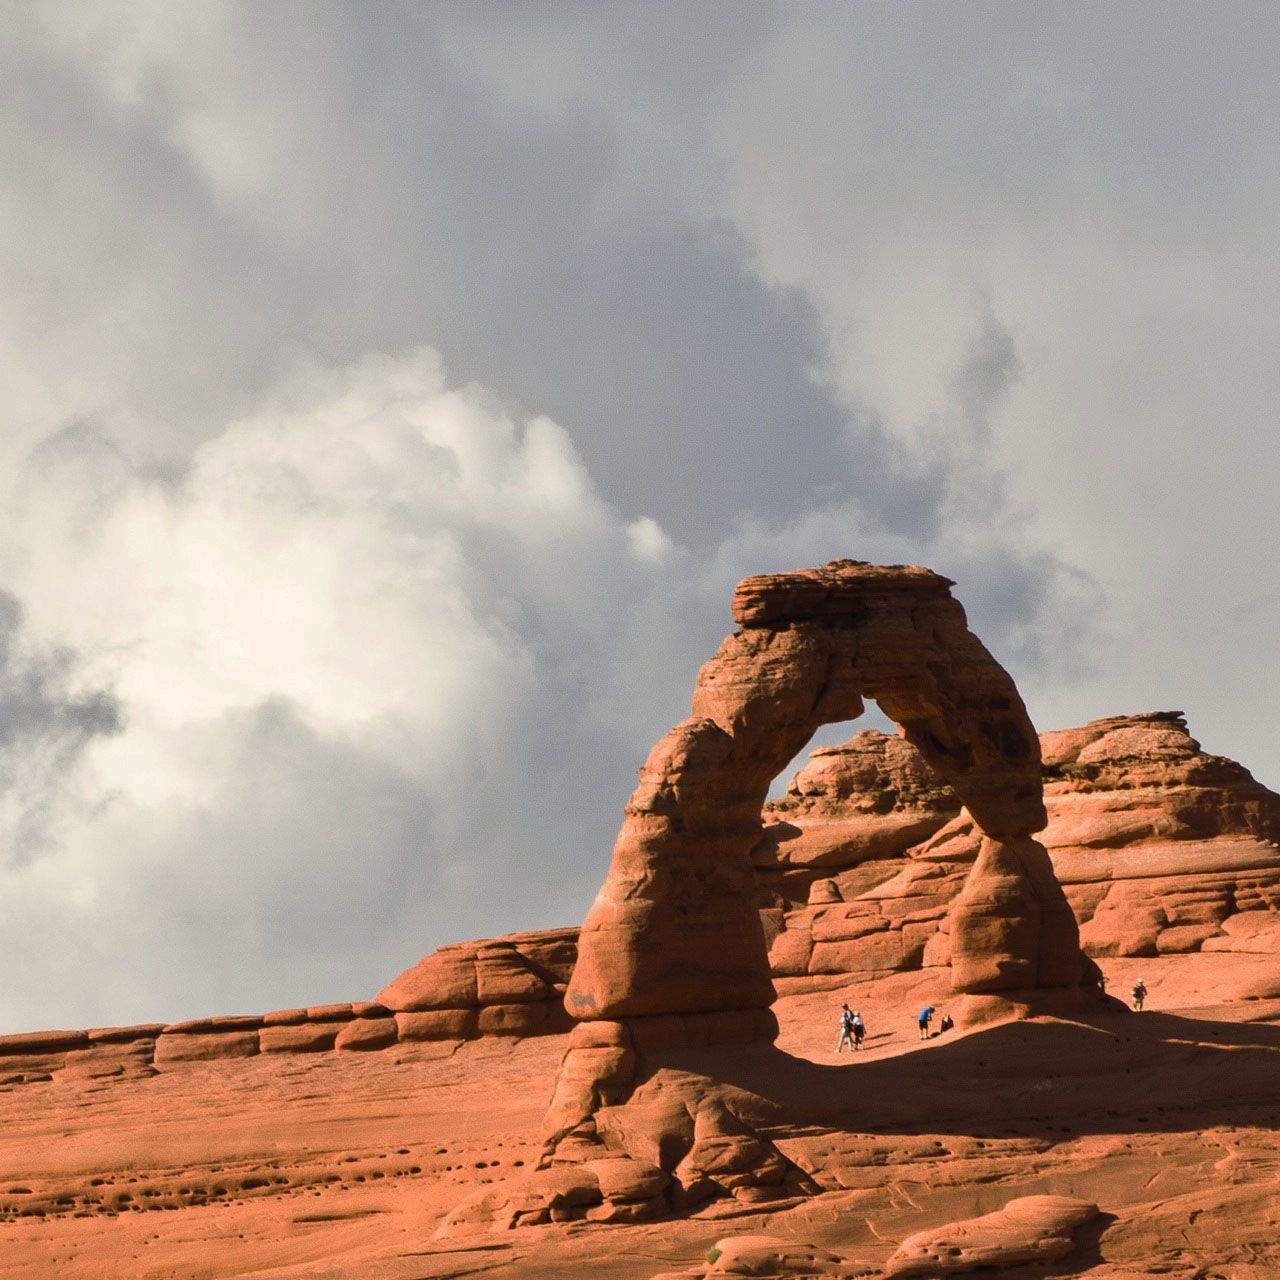
I thought having people in each of these shots actually helped to provide scale to the size of the arch.
No comments:
Post a Comment
Note: Only a member of this blog may post a comment.